I’ve been homebrewing on-and-off for years now, and had pretty good results. I’ve had a break of a year or so now since I last brewed, and that was the same as every other one I’ve done, a “can and a kilo” kit. These are basically a big tin can of malt extract, and usually a kilo of sugar/spraymalt, hence the name. They make a nice brew and it’s very satisfying (not to mention cheap!), but it’s always felt a bit removed to me. Ok, I’m making beer, but all I’m doing is diluting the treacle from the tin, adding some yeast and some sugar to feed that yeast. So now, I’ve decided to take step of moving to All Grain brewing!
All Grain (AG) is brewing the way all breweries have done for centuries; taking the grain (malted barley usually), water, hops and yeast to create lovely beer. However, it’s a bit of an art with some science behind it, and it requires quite a bit of equipment, but apparently the results are worth it, so I’m going to give it a go. Partially because I want to have control over the flavours and aromas, but mostly because I’ve got it in my head now.
So, equipment then. As I mentioned, AG needs a fair bit of equipment compared to kit brewing. Have a look at the comparison below. Note that this is just the necessary bits and pieces, you’ll probably end up using quite a few extras.
| Kit | AG |
| Fermenting bin | Mash Tun |
| Tin of extract | Hot Liquor Tank (HLT) |
| Sugar | Boiler |
| Yeast | Cooler |
| Fermenting bin | |
| Thermometer | |
| Hydrometer | |
| Grain (malted barley, wheat etc.) | |
| Yeast | |
| Hops (for flavour, bittering and aroma) |
At least twice as much stuff. While you can do a kit in one bin, most AG brewers use a three vessel set-up; HLT, Mash Tun, Boiler. That’s before it even gets as far as the fermenting bin.
All of this kit can cost a lot, I’ve seen kits online for about £300, but I want to do it cheaper if I can, and in the spirit of ‘doing it all from scratch’ I’m going to make what I need wherever possible.
Starting with the mash tun.
I’m simplifying here, but bear with me. The mash tun is where the magic happens. It’s where water and malted barley turn into the sweet pre-beer known as wort (said ‘wert’). The grain goes into a container where hot water (and the temperature has to be just right) is added. The resultant soup (mash) sits for about an hour, converting the starch into sugars, before the wort is drained off. To then to get the rest of the sugars out we ‘sparge’, which is to add the bulk of the water at a higher temperature in order to stop the process. Obviously what we want here is a clear liquid, so somehow we need to make sure the milled barley doesn’t come out too.
But how?
There are a lot of different solutions, some involving tubing in the bottom of the tun, some using fine mesh bags, and some using false bottoms. I’m going with the latter, and doing a build based on this instructable.
I went off to the likes of Wilkinsons, B&Q and Screwfix to gather all the parts I needed.

Two fermenting bins, 15mm copper pipe, tank connector, 15mm compression elbow, 15mm female elbow, ball valve tap, food grade 12.5mm plastic pipe, duct tape, PTFE tape
From there I started putting things together. Unfortunately I immediately ran into a snag – quite a big one. The tank connector which fits in the hole of the bin I’ll be making, isn’t 15mm (the diameter of the copper pipe I’m using) all the way through. Halfway through it changes diameter, which means I can’t plumb the pipe through as I need to. I’m going to get a round file to fix it, as that seems to be the most popular way online, judging by the posts of people who’ve run into exactly this problem before.
Undeterred, I’ve carried on and got at least something done. The inner of the two bins, where the grain will sit, needs lots of small holes drilled in the bottom to let the liquid drain through (slowly), but to keep the grain seperate. I followed the instructable here, and while I didn’t go to the bother of marking them all out first, I ploughed on with a 2mm bit in my drill and got to work.
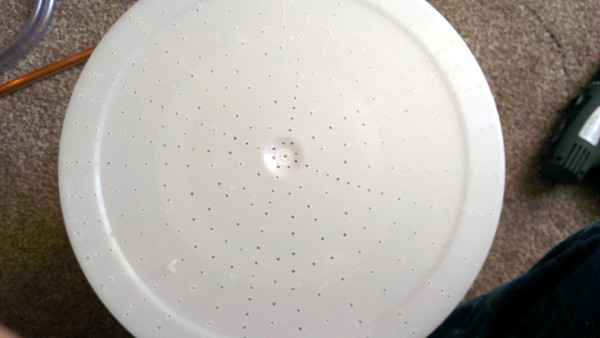
The bottom of one of the fermenters, after drilling

A view of the inside, see all the lovely holes.
I deliberately stopped before I went too far, just to keep some integrity in the base (I have no idea how much it’ll all weigh) and to make sure the wort and sparge water doesn’t drain through too quickly. If it goes too slowly, I can always drill some more, but I can’t really go filling holes in.
So there we go, a brief introduction to what I’m up to, and what’s involved. I’ll update again once I get hold of that round file and finally sort out the tap plumbing.